How to use Bind-DI Dependency Injection container
Bind-DI is Decorator based Dependency Injection framework.
This means that all components, component lifetime scopes and dependencies are expressed via applying simple Decorators on Classes, Properties and property Setters.
This also means that there is no need for any type of external configuration file.
An important feature of Bind-DI Framework is auto-discovery and auto-loading of components from the file system.
4 phases of container lifecycle
| Phase | What takes place |
|---|---|
| Loading | Recursively scan directories, discover exported classes that are decorated with @Component or with other related decorators. Add components to Container The discovery and loading of classes from file system is synchronous operation. |
| Initialization | 1. Validate that all loaded components that have dependencies (via @Inject or via implicit constructor dependencies) can find all dependencies in container. 2. Validate that there are no dependency loops. 3. Instantiate all components that have @PostConstruct decorator and call these post-construct methods and wait for Promise(s) returned from post-construct to resolve. Only after every post-construct method has resolved the initialize() method itself is resolved. At this point container is ready for use. |
| Runtime | In this phase Container is responsible for returning components to the client. The client uses .getComponent method, passing Identity of requested component and Container returns instance of requested component, complete with all necessary component dependencies. |
| Cleanup | When application exits its recommended to call container.cleanup() method. This method calls methods decorated with @PreDestroy on all components. When all Promises returned by these methods resolved the Promise returned by cleanup() method is resolved. This gives Components a chance to close DB connections, release other resources as necessary |
An Example
Here is a small example of how to user Bind-DI Container. In this example we create 3 components - 2 in “Components” directory and one in “Settings” directory
We also have the app.ts file - the entry point for application.
Notice we don’t need any settings files - we simply create component classes in any directory we choose. There is no special naming convention for directory structure.
As long and classes have the @Component decorator they are auto-loaded to container.
Here is the directory structure.
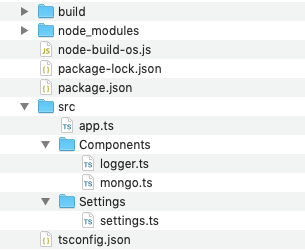
In this example we have the following dependencies:
MongoComponent depends on Logger and on Settings components
Logger component also depends on Settings Component
Settings does not have any dependencies.
All dependencies in this example are injected via implicit Constructor Injection
Component files
// src/Settings/settings.ts

import {Component, EnvOverride} from 'bind-di';

@Component
@EnvOverride
export class Settings {
  public LOG_LEVEL = 'INFO';
  public MONGO_URI = 'mongodb://localhost:27017/app1?authSource=admin';
}
// src/Components/logger.ts

import { Settings } from '../Settings/settings';
import { Component } from 'bind-di';

@Component
export class Logger {

  constructor(private settings: Settings) {
  }

  public log(logLevel: string, message: string){
    console.log(`LogLevel=${logLevel} message=${message}`)
  }

  public info(message: string){
    return this.log('INFO', message);
  }

  public debug(message: string){
    if(this.settings.LOG_LEVEL === 'DEBUG'){
      return this.log('DEBUG', message);
    }
  }
}
// src/Components/mongo.ts

import { Logger } from './logger';
import { Settings } from '../Settings/settings';
import { Component, PostConstruct, PreDestroy } from 'bind-di';
import { Collection, Db, MongoClient } from 'mongodb';

@Component
export class MongoComponent {

  private mdb: Db;
  private mongoClient: MongoClient;

  constructor(private settings: Settings, private logger: Logger) {
  }

  public getCollection(name: string): Collection {
    return this.mdb.collection(name);
  }

  @PostConstruct
  init(): Promise<boolean> {
    return MongoClient.connect(this.settings.MONGO_URI, { useUnifiedTopology: true })
      .then((client: MongoClient) => {
        this.mongoClient = client;
        this.logger.info('MONGO CONNECTED');

        this.mdb = client.db();

        return true;
      })
      .catch((e) => {
        this.logger.info(`Mongo Connection Error ${e}`);
        throw e;
      });
  }

  @PreDestroy
  disconnect(): Promise<boolean> {
    this.logger.info('Entered destructor on Mongodb Component Factory');
    return this.mongoClient.close().then(() => {
      this.logger.info('MongoDB Connection Closed Successfully!');

      return true;
    });
  }
}
// src/app.ts

import { Container, Identity, load } from 'bind-di';
import { MongoComponent } from './Components/mongo';
import { Logger } from './Components/logger'

const container = new Container({componentDirs: [__dirname]});

async function run() {

  await container.initialize();
  const db: MongoComponent = container.getComponent(Identity(MongoComponent));
  const logger = container.getComponent(Identity(Logger));

  const booksCollection = db.getCollection('books');
  const books = await booksCollection.find({}).toArray();

  logger.info(JSON.stringify(books));
}

run()
  .then(() => console.log('DONE'))
  .catch(error => console.error(error))
  .finally(() => container.cleanup());
Notice that since the container’s initialize() method is asynchronous we run it inside an async function so that we can use await keyword
Also notice that since we are calling async function run(), its’ return value is a Promise and at use a .finally() callback on that promise with a call to
container.cleanup()
That call is important because it causes all components that have @PreDestroy method to run these methods.
This gives a container a chance to make sure that all components that need to close database connections of close any open resources to close such resources when application exits.
The Interesting lines inside the run() method are these:
const db: MongoComponent = container.getComponent(Identity(MongoComponent));
const logger = container.getComponent(Identity(Logger));
We ask a container for an instance of MongoComponent class. We do this by passing the Identity of component
The Identity is a function that takes either a Class for an unnamed component or a string or Symbol for a named component.
The Container’s job is the return an instance of Component, creating the instance if necessary or returning already existing instance if it’s a Singleton Component.
During the creation if instance the Container will create the Instances of other components needed as constructor dependencies. After the instance is created the Container will then call property assignment operations, setting the Instance’s properties or setter methods (setters are invoked via same property assignments) for the Component properties decorated with @Inject decorator
@EnvOverride
Notice that Settings component has @EnvOverride decorator.
This allows us to override the property values by setting these values via environment variables.
For example if we first export environment variable MONGO_URI before starting the app, then when the instance of Settings component will return this new value when asked via settings.MONGO_URI
This is a convenient way to define default configuration in the Settings class but also to be able to override the values from Environment without the need to change the code. All that is needed is to export new environment variables and restart application.